Category: Expressive Photography
Post Type:
Mixed Media
Photography
Mixed Media: Maximum
Pays
one point
and 2 member cents.


© Copyright 2024. avmurray All rights reserved.
avmurray has granted FanStory.com, its affiliates and its syndicates non-exclusive rights to display this work.
Posted: April 18, 2015
  |
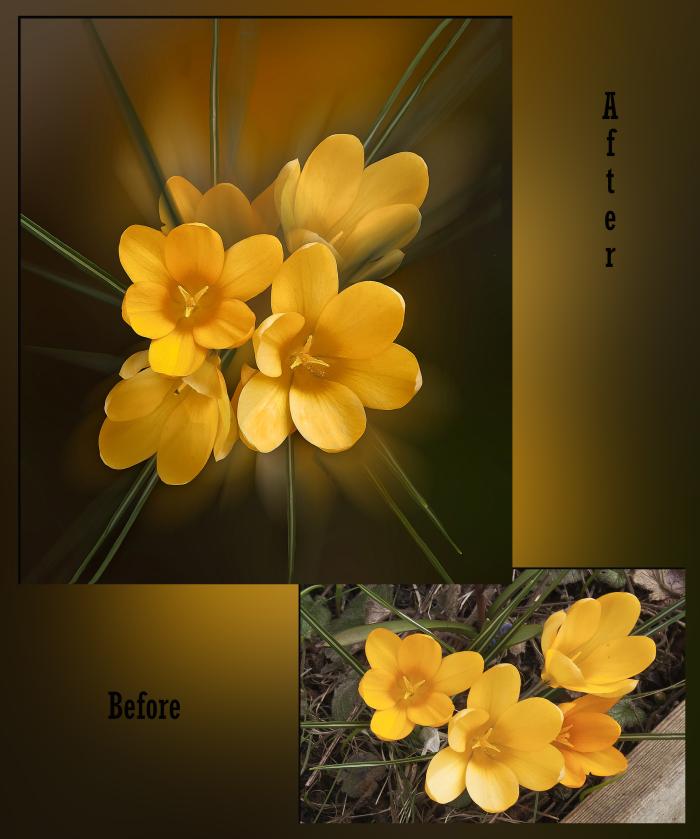
Yellow Crocus
We are The Spring
by avmurray
Interested in this? Contact The Artist
Before and After Contest Winner
 You can own this. Offers accepted. Information
I have probably done a few more adjustments under the way, but I think I have a complete list of the process creating this.
You can own this. Offers accepted. Information
I have probably done a few more adjustments under the way, but I think I have a complete list of the process creating this.
1.Duplicate original
2.Add Gaussian blur in Photoshop to one of these layers and use it as a background.
3.Cut out the flowers in the second layer
4.Duplicate the cut out
5.Erase the two flowers on the left in one of them, and keep the two on the right. This now becomes layer 2.
6.Then go back to the other and erase the two flowers on the right. Keep the two flowers on the left. This now becomes layer 3
7.Duplicate layer 2, and you will have 4 layers.
8.Rotate, turn and adjust the 3 flower layers until you are pleased with the arrangement.
9.Then add zoom effect to the 3 flower layers, and you will now have 7 separate layers
10.Add drop shadows to the three flower layers
11.At this point I start to adjust saturation and light on all the different layers. In this case I also changed the opacity of the two flower layers behind the two flowers standing out. In this way you create more depth.
12.Flatten all the flower and zoom effect layers, but keep the background. You now have 2 layers left. At this point I decide if I am satisfied with the placement of the layers within the frame., and do adjustments of necessary.
13.I now zoom in to 200 % and take out stains or imperfections in the petals of the flower.
14.Now I am adding oil painting filter minimum to the flower layer.
15.Then I flatten the two layers.
16. Final adjustments are done with Topaz Lens effects. Like exposure, saturation and contrast. Also a slight vignette is added.
by avmurray Interested in this? Contact The Artist
1.Duplicate original
2.Add Gaussian blur in Photoshop to one of these layers and use it as a background.
3.Cut out the flowers in the second layer
4.Duplicate the cut out
5.Erase the two flowers on the left in one of them, and keep the two on the right. This now becomes layer 2.
6.Then go back to the other and erase the two flowers on the right. Keep the two flowers on the left. This now becomes layer 3
7.Duplicate layer 2, and you will have 4 layers.
8.Rotate, turn and adjust the 3 flower layers until you are pleased with the arrangement.
9.Then add zoom effect to the 3 flower layers, and you will now have 7 separate layers
10.Add drop shadows to the three flower layers
11.At this point I start to adjust saturation and light on all the different layers. In this case I also changed the opacity of the two flower layers behind the two flowers standing out. In this way you create more depth.
12.Flatten all the flower and zoom effect layers, but keep the background. You now have 2 layers left. At this point I decide if I am satisfied with the placement of the layers within the frame., and do adjustments of necessary.
13.I now zoom in to 200 % and take out stains or imperfections in the petals of the flower.
14.Now I am adding oil painting filter minimum to the flower layer.
15.Then I flatten the two layers.
16. Final adjustments are done with Topaz Lens effects. Like exposure, saturation and contrast. Also a slight vignette is added.
Mixed Media: Maximum

Before and After Contest Winner |
 Recognized |
We are The Spring
by avmurray
You need to login or register to write reviews. It's quick! We only ask four questions to new members.
© Copyright 2024. avmurray All rights reserved.
avmurray has granted FanStory.com, its affiliates and its syndicates non-exclusive rights to display this work.